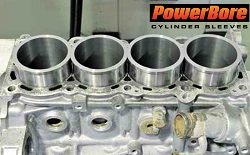
Installing cylinder sleeves correctly is one of the most important steps in building or rebuilding a reliable engine. Whether you call them cylinder sleeves or cylinder liners, these components must be fitted with precision. A poor installation can lead to distortion, sealing issues, blowby, loss of compression, and premature engine failure. A proper installation, on the other hand, helps support performance, durability, and consistent cooling.
Installing cylinder sleeves is not a shortcut job. It takes the right tools, careful measurements, controlled heat, and a clear understanding of interference fit. In high-performance and heavy-duty engine applications, even small mistakes can create major problems later. That is why it is critical to follow a process that protects both the sleeve and the engine block.
The Wrong Way to Install Cylinder Sleeves
Before discussing the correct installation process, it is important to point out a method that should never be used. Some old-school engine builders have installed sleeves by placing a block of wood on top of the sleeve and hammering it into the bore. While that approach may force the sleeve into place, it is not a reliable or professional way to install cylinder liners.
Can a sleeve be driven into an engine this way? Sometimes, yes. Should it be? Absolutely not.
Cylinder sleeve installation depends on exact dimensions, proper interference fit, and correct clearance. Hammering a sleeve into place can damage the sleeve, distort the bore, or create an improper fit that hurts engine performance. In a high-performance engine, those problems can quickly turn into lost compression, blowby, sealing failures, and unnecessary repair costs.
Why Proper Fit Matters
Before installing a cylinder sleeve, the bore must first be machined to the correct dimensions to accept it. This is one of the most important parts of the job. If the block is not prepared correctly, the sleeve will not seat or perform the way it should.
The correct interference fit will vary depending on the block material and the engine application. Aluminum and iron behave differently because aluminum expands more with heat than iron does. In general, the commonly accepted standard is about .004 inch interference fit for an aluminum block and approximately .002 to .004 inch for an iron block, depending on bore size and whether the engine uses wet or dry sleeves.
If the fit exceeds .004 inch, the risk of sleeve or cylinder distortion increases. Once distortion occurs, it can affect ring seal, piston clearance, heat transfer, and overall engine efficiency. That is why establishing the correct fit is so important. The sleeve must stay securely in place while also allowing the cylinder to transfer heat properly during operation.
Preparing the Block for Cylinder Sleeve Installation
Once the block has been bored to the correct dimensions, preparation becomes the next priority. All obstructions must be removed from the engine block before installation begins. Nuts, bolts, hardware, and any other components that interfere with access to the cylinder should be cleared away first.
While that may sound obvious, overlooking basic prep work can create unnecessary complications. The cleaner and more organized the setup is, the better the chances of achieving a clean, accurate installation.
It is also important to verify that the sleeve and the block are both clean and free of debris. Dirt, burrs, or surface imperfections can affect how the sleeve seats in the bore. When working with high-performance engine components, attention to detail matters at every stage.
Heating the Block for Installation
One of the most common professional methods for installing cylinder sleeves is to heat the block before the sleeve is fitted. The block is typically heated to 400 degrees Fahrenheit and held at that temperature for about one hour so the cylinder area heats evenly.
This controlled heating causes the block to expand slightly, making it easier for the sleeve to drop into place without excessive force. This is the preferred method because it helps preserve the integrity of both the block and the sleeve.
If the sleeve has ports, special care must be taken during installation to ensure those ports align correctly. Port alignment is critical. Once the block cools, adjustments may be needed to blend and chamfer the ports so there is no mismatch between the sleeve and the cylinder wall. If the block has complex port shapes or tight entry angles, cylinder sleeve installation should be handled by an experienced machinist.
Honing Cylinder Sleeves After Installation
Not every cylinder sleeve is finished the same way prior to installation. In some engine blocks, particularly some wet sleeve applications, the sleeves may be honed to specification before they are installed. In other cases, the sleeves must be honed after installation in the block.
If the cylinder sleeve has not been finish-honed before installation, it must be honed afterward to achieve the correct piston clearance. This step is essential for performance and reliability. Proper honing helps establish the final surface finish, supports ring seal, and ensures the piston-to-wall clearance matches the engine’s requirements.
Skipping or rushing this step can undermine the quality of the entire installation. Even if the sleeve is seated correctly, improper finish dimensions can still lead to poor performance and wear issues.
Decking the Block After Sleeve Installation
After the cylinder sleeve is installed, many applications require the top of the cylinder or deck surface to be machined. Decking helps ensure the surface is flat and consistent so the head gasket can seat properly and create a reliable seal.
This step is especially important in performance engines where combustion pressure and sealing demands are higher. A properly decked surface helps prevent sealing problems that could affect compression, coolant control, and long-term durability.
Installing Wet Cylinder Liners
Wet cylinder liners differ from dry sleeves in a few important ways. If you are rebuilding an engine with wet sleeves, which is common in many diesel applications, interference fit is usually less of a concern. Many wet cylinder liners are designed for a slip fit installation and are often honed to specification before being installed into the block.
In these applications, the most critical area is usually the counterbore. The counterbore must be machined correctly to accept the flange of the liner. If it is not machined properly, the sleeve will not seat correctly, which can create sealing and fitment problems.
That is why wet liner installation requires just as much precision as dry sleeve installation, even though the fit method is different. The details change, but the need for accurate machining never does.
When to Leave Cylinder Sleeve Installation to a Machinist
There are situations where cylinder sleeve installation should not be treated as a do-it-yourself project. If the engine block requires precise port alignment, specialized machining, complex counterbore work, or post-installation finishing, the job may be best left to an experienced machinist.
A professional shop has the equipment needed to measure the bore accurately, establish the right fit, heat the block correctly, and finish the sleeve to the exact specifications required. For high-performance, diesel, racing, or custom engine applications, that level of precision is often worth the investment.
Final Thoughts on Installing Cylinder Sleeves
Installing cylinder sleeves the right way is about much more than getting the part into the block. It is about creating the correct fit, protecting the integrity of the engine, and making sure the sleeve performs as intended once the engine is running. Proper machining, controlled heat, careful alignment, correct honing, and final deck work all play a role in a successful installation.
Whether you are working with dry cylinder sleeves, wet cylinder liners, or a custom engine build, precision matters. A properly installed sleeve supports cooling, compression, piston clearance, and long-term durability. A poor installation can create problems that are expensive and time-consuming to fix.
At PowerBore, quality cylinder sleeves are built for demanding applications where performance and reliability matter. If you need help choosing the right sleeve for your engine or application, the right product and the right installation process can make all the difference.